Crochet with Kate: Adorable Apple Cozies!
Published on December 19, 2015 By Merion 2 min read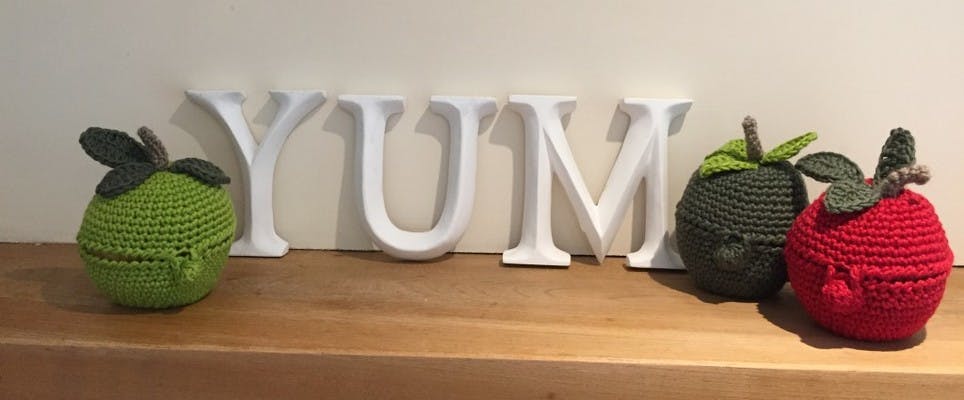
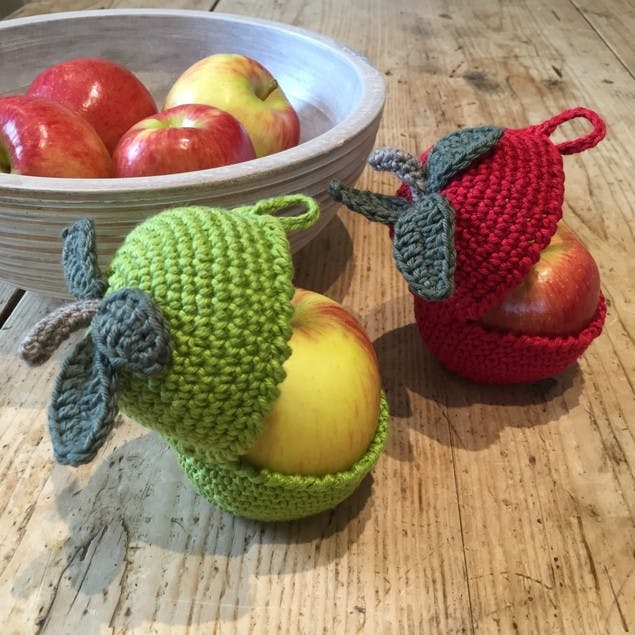
We’ve had a lovely week themed around childrenswear – and now it’s time for a fun project to keep your kids munching crunchy apples! Kate Eastwood, author of the Just Pootling blog brings you apple cozies with a difference!
Here we are heading in to autumn again and the start of a new school year! Suddenly we are back to the daily ritual of trying to make interesting and fun packed lunches whilst wondering how on earth we are going to eat our way through all the apples that are around at this time of year!
Well, hopefully today’s make will go some small way to easing both of these niggles! What could be better than the cutest little apple cozy to protect your apple at the bottom of your work bag? Your apple will be looking just as fresh as when it was picked from the tree!
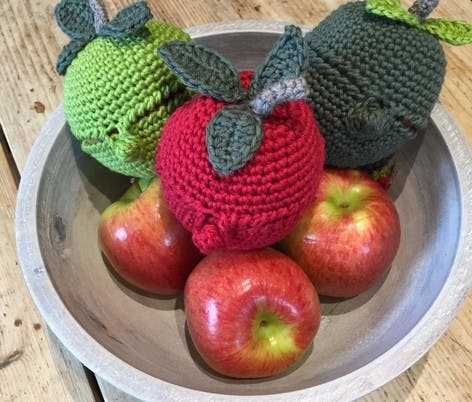
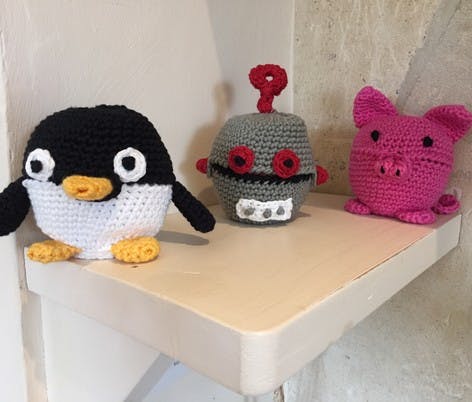
And for those little treasures in your life, we have pig, robot and penguin apple cozy patterns for them to enjoy. How fun!
You will need:
- For the apples : Rowan Handknit Cotton in Gooseberry 219, Forest 370 and Rosso 215. For the stalks I used the smallest of pieces of brown yarn from my leftover yarns.
- For the pig: Flamingo 368 and the smallest pieces of Black 252.
- For the robot: Raffia 330, Rosso 215, a small amount of black and a small amount of white.
- For the penguin: White 263, Black252 and Bee 364
- A 3.5mm hook
- A tapestry needle for sewing in ends and making up.
Yarn note: For colors that have sold out or have been discontinued, Paintbox Yarns Cotton DK is the perfect substitute. With 51 shades in this range, it's easy to match the colors for these delightful apple cozies!
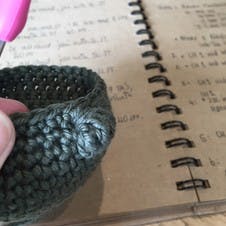
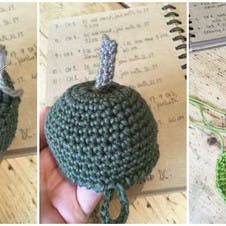
All the covers are made in the same way, with a top and bottom piece joined with a ‘hinge’ of oversewing at the back and each cozy is fastened with an integrated bobble, whether it is at the front just as a regular bobble or at the side or front as a nose/beak or ears.
The basic cover: bottom half step-by-step
1
Let's get started. Begin by making a Magic Ring and work 4 dc in to the ring. Join with a sl st.
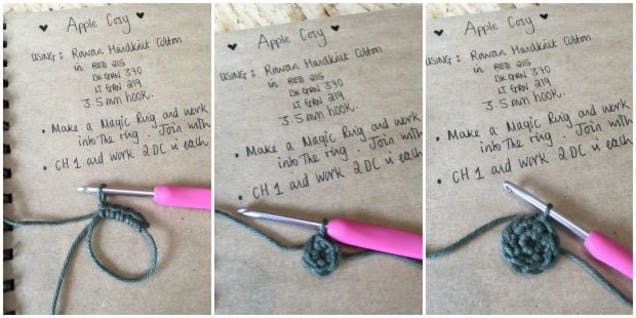
2
For round 1. Ch 1 and work 2 dc in each st. Join with a sl st. 8 sts.
3
For round 2. Ch 1 and work 2 dc in each st. Join with a sl st. 16 sts.
4
For round 3. Ch 1 and work 1 dc in each st. Join with a sl st. 16 sts.
5
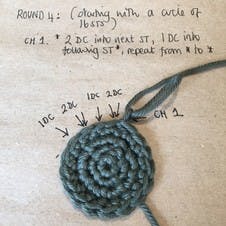
For round 4. Ch 1. *2 dc in to the next st, 1 dc in to the following st*. Repeat from * to *all the way around. Join with a sl st. 24 sts.
6
For round 5. Ch 1, work dc all the way round, join with sl st. 24 sts.
7
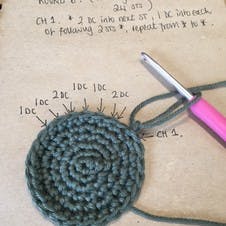
For round 6. Ch1 *2 dc in to next st, 1 dc in to each of the next following 2 sts*. Repeat from * to *. Join with a sl st. 32 sts.
8
For rounds 7 and 8. Ch 1, dc all the way round. Join with a sl st. 32 sts
9
For round 9. Ch 1 *2 dc in to next st, 1 dc in to each of the next 3 st. Join with a sl st. 40 sts
10
For rounds 10, 11 and 12. Dc all the way round, join with a sl st. 40 sts
11
For round 13. This is the round where you will be working a bobble in to your stitches that will act as your fastener. Ch1, dc 19, make a bobble by working 7 tr in to the next st, remembering to leave the final loop of each tr on your hook. You will end up with a total of 8 loops on your hook. Yarn over and pull through all 8 loops.
12
Keep it going. Continue on round in dc to the end of the round, join with a sl st. 40 sts.
13
For round 14. Ch 1, dc all the way round, join with a sl st. 40 sts
14
For round 15. To make a firm edging the last round is going to be worked in Rope Stitch. This is just dc but working anti-clockwise instead of clockwise as usual. At the end of the round join with a sl st, finish off and sew in ends.
The basic cover: top half step-by-step
1
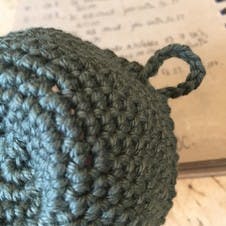
Get started. The top half is worked in exactly the same way as the bottom half, right up until the final round of the rope stitch. To make the loop to fasten around the bobble you will be working a short length of ch st half way round. Work 19 st in Rope Stitch (anti-clockwise dc) then make a ch of 10, continue working rope stitch to the end of the round and finish off.
2
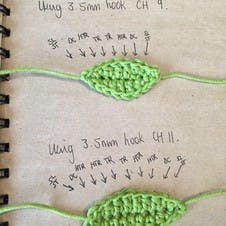
Add a leaf or two. For the regular apple cozies I just added some leaves and a stalk. I worked two small leaves and one large leaf for each apple as follows. For the small leaves, using a 3.5 mm hook make a Ch of 9. Beginning in the second chain from the hook work 1 sl st, 1 dc, 1 htr, 1 tr, 1 tr, 1 htr, 1 dc and 1 sl st.
You are now going to work along the other side of the chain so turn your work so that the stitches you just worked are now on the bottom and work the exact same pattern of stitches again. Finish off and sew in your ends, leaving one end with a long tail ready for sewing the leaf to the apple.
3
For the large leaf. The large leaf is worked in a similar way but you start with a ch of 11 and work the following st pattern: 1 sl st, 1 dc, 1 htr, 1 htr, 1 tr, 1 tr, 1 htr, 1 htr, 1 dc, 1 sl st.
Finish off and sew in your ends leaving a long tail to attach your leaf to your apple.

4
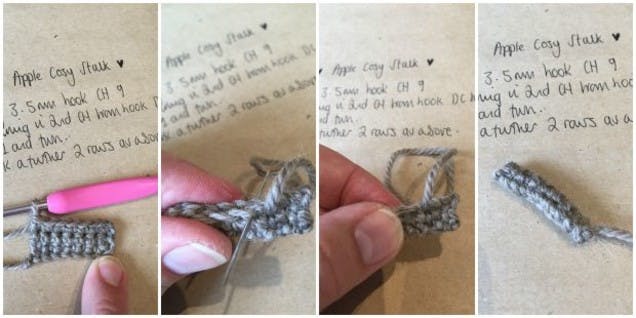
For the stalk. Using a 3.5mm hook make a ch of 9. Beginning in the second ch from the hook dc to the end. ch 1 and turn. Work a further 2 rows. Finish off and using one of the ends sew the long edges of the stalk together.
5
Attach it. Attach the stalk to the apple by threading it through at the top of the cozy and stitching in place inside the cozy. Attach the leaves in the same way.
6
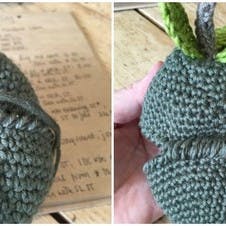
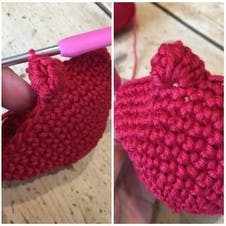
Sew it. The final step is to sew the top and the bottom together by working a row of oversew stitches along the back . Finish off and sew in ends. And there you have it! You made an apple cozy!
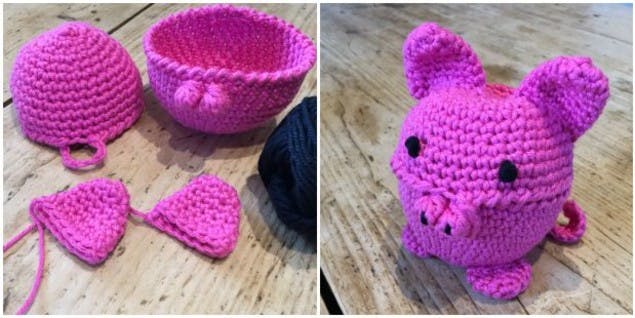
Pig apple cozy step-by-step
1
For the bottom half. Work as the standard cozy pattern to round 13. To make the pigs snout you will be making two bobbles instead of one, so dc 18, make a bobble, then make a further bobble in the next stitch. Continue in dc to the end of the round. Finish the rest of the bottom half as per pattern above. You will also need to make ears, trotters and a tail as follows.
2
To start the ears. Make 2. Make a Magic Ring and work 6 sts in to it. Join with a sl st. For round 1, 1 dc then 2 dc in next st all the way round. 9 st.
3
Start on round 2. 1 dc in each st. Then for round 3, 1 dc in the next 2 st then 2 dc in the next st. 12 st. Then for round 4, 1 dc in each st.
4
For round 5. 1 dc in the next 3 st then 2 dc in the next st. 15 st.
5
For rounds 6 and 7. 1 dc in each st. Sl st to join, finish off and sew in ends leaving one end to attach the ears to the top half of the cozy.
6
To start the trotters. Make 2. ch 2, work 6 dc in to the second chain from the hook. Then for round 1, 2 dc in each st. 12 st.
7
For rounds 3 and 4. Dc in each st. Finish off and sew in ends leaving a tail long enough to sew the trotters to the bottom half of the cozy.
8
To make the tail. Make a ch of 15. Work 2 tr in to each st. 30 st. Finish off and sew in ends leaving a tail long enough to sew the tail to the bottom half of the cozy.
9
Finish it off. To finish work two French Knots in black for the eyes and two single stitches for the nostrils in black.
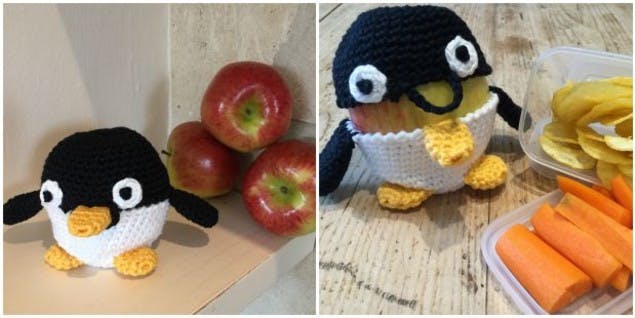
Penguin apple cozy step-by-step
1
For the bottom half. Make as in the standard cozy pattern, working the bottom in white. You will not need to work a bobble in to the bottom half as the beak will be sewn on afterwards.
2
For the top half. Make as in the standard cozy pattern, working the top in black. When working the final rope edge round make the loop chain 15 st long. You will also need to make a beak, two feet, two wings and two eyes.
3
To get started on the beak. For round 1, in the yellow ch 2, work 6 st in to the second chain from the hook. The for round 2, dc 1 in next st, 2 dc in next st to the end of the round. 9 st
4
For rounds 3, 4 and 5. Work a further three rounds of dc. 9 st. Finish off and sew in ends leaving a tail long enough to sew the beak to the centre of the final round of the bottom half.
5
To get started on the feet. Make 2 in yellow. For round 1, ch 2, work 6 dc in to the second chain from the hook. For round 2, 2 dc in each st. 12 st
6
For rounds 3 and 4. Dc in each st. 12 st. Finish off and sew in ends leaving a tail long enough to sew the feet to the base of the bottom half.
7
To make the wings. Make 2 in black. Using black, work as for the feet, but work a further 4 rounds to get the correct length. Finish off and sew in ends leaving a tail long enough to attach the wings to the top edge of the bottom half.
8
To make the eyes. Using white make a Magic Ring and work 4 sts in to the ring. For round 2, work 2 dc in to each st. 8 st. Join with a sl st.
9
Finish it off. Using black work a large French Knot in to the centre of the white circle. Finish off and sew in ends leaving a tail long enough to attach the eyes to the top half of the cozy.
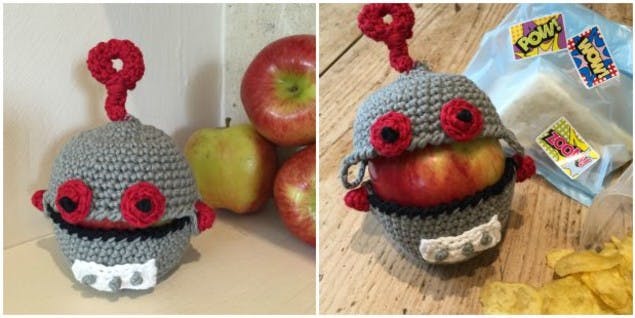
Robot apple cozy step-by-step
1
For the bottom half. Work as for the standard apple cozy but work round 13 as follows. CH1, DC 10, in the 11th st work a bobble in red. Change back to grey and work the next 18 STs. Then make a further bobble in red, change back to grey and dc the final 10 st. For my final rope stitch round I worked the back half of this round in grey and worked the front half in black.
2
For the top half. Work as for the standard bottom apple cozy but when working the final rope edge round make two chain loops of 10 st in the 11th dc and 30th dc. You will also need to make two eyes, a control panel and an antenna.
3
For the eyes. Using red make a Magic Ring and work 4 sts in to the ring. Round 2: Work 2 dc in to each st. 8 st. Join with a sl st. Using black work a large French Knot in to the centre of the red circle. Finish off and sew in ends leaving a tail long enough to attach the eyes to the top half of the cozy.
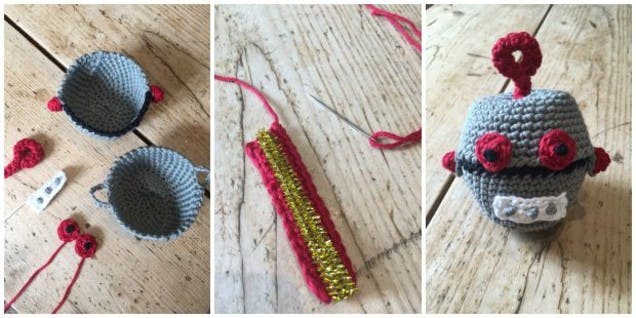
4
For the control panel. Using white make a ch of 9. Beginning in the second ch from the hook work dc to the end. ch 1 and turn. Work a further two rows. Finish off and sew in ends leaving a tail long enough to attach the panel to the centre front of the bottom half of the cozy. I worked 3 large French knots on to the panel.
5
For the antenna. Using red make a ch of 15. Beginning in the 2nd Ch from the hook work dc to the end of the row. Ch 1 and turn. Work a further 3 rows. Place a length of pipe cleaner in the centre of the rectangle and sew the long edges together. Bend the antenna in to the correct shape, finish off and sew in ends leaving a tail long enough to attach to the top of the head. And there you have it: an apple cozy for every occasion!