Make a crochet hook case with Anna Nikipirowicz
Published on April 17, 2019 By Anna Nikipirowicz
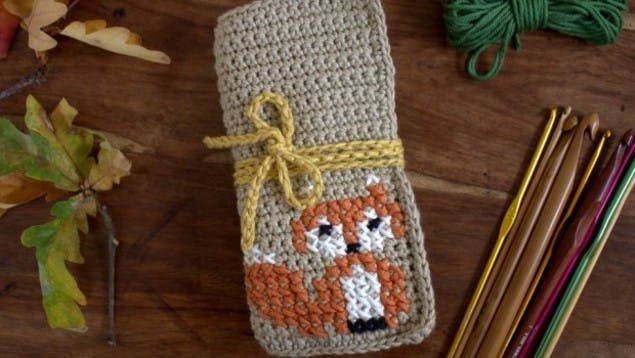
Keep your hooks tidy with a gorgeous crochet hook case from fabulous designer Anna Nikipirowicz!
Materials
- Rowan Handknit Cotton
- 2 balls in shade Linen (205) - Color A
- Paintbox Yarns Simply DK - 10g Mini Ball
- 1 of each shade Pure Black, Paper White, Slate Green, Pistachio Green, Buttercup Yellow, Seville Orange, Light Camel
- KnitPro Waves Crochet Hook
- Size 4.00mm
- Rico Felt Sheets 60x90
- Pony Gold Eye Sewing Needles
- KnitPro Tapestry Needle Set
- Matching sewing thread
Tension
18 DC and 21 rows to 10 cm (4 in) square measured over pattern using 4.00mm (US G/6) crochet hook.
Finished size
When laid out flat the case measures: 24.5 cm in length and 17 cm in height (10 in x 6.7 in).
Abbreviations (UK terminology)
Sts - Stitches
Ch - Chain
DC - Double crochet
Sl St - Slip stitch
If you’ve got some time between projects, why not make yourself a new crochet hook case? Our fabulous friend, designer Anna Nikipirowicz, has created this step by step tutorial for you to create a beautiful case adorned with a sweet little fox and acorn in cross stitch!
Anna blogs at Moochka.co.uk, and you can buy her wonderful crochet patterns on LoveCrochet here. Don’t miss her gorgeous book too, Twenty to Make: Crocheted Purses, full of purses big and small that are perfect for little gifts!

Making the case
The main piece
Foundation: With your main color Ch 44.
Row 1 (RS): 1 dc into second ch from hook, 1 dc into every ch to end. (43 sts)
Row 2: ch 1, 1 dc into every dc to end.
Repeat row 2, 32 more times.
Work should measure 16cm in height and 23.5cm in length (6.2 in x 9.2 in).
Fasten off
The pocket
Foundation: With your main color Ch 44.
Row 1 (RS): 1 dc into second ch from hook, 1 dc into every ch to end. (43 sts)
Row 2: ch 1, 1 dc into every dc to end.
Repeat row 2, 13 more times.
Fasten off.
The flap
Foundation: With your main color Ch 44.
Row 1 (RS): 1 dc into second ch from hook, 1 dc into every ch to end. (43 sts)
Row 2: ch 1, 1 dc into every dc to end.
Row 3 (RS): ch 1, dc2tog, 1 dc into every dc to last two dc, dc2tog. (41 dc)
Row 4: ch 1, 1 dc into every dc to end.
Rows 3 and 4 form the decrease pattern, repeat the pattern 2 more times. (37 dc)
Fasten off.
Making up
Weave in ends and press each piece gently.
Embroidering the design
Cross stitching on to crochet is a wonderful and easy way to decorate, and double crochet stitch is an ideal base for adding cross stitch.
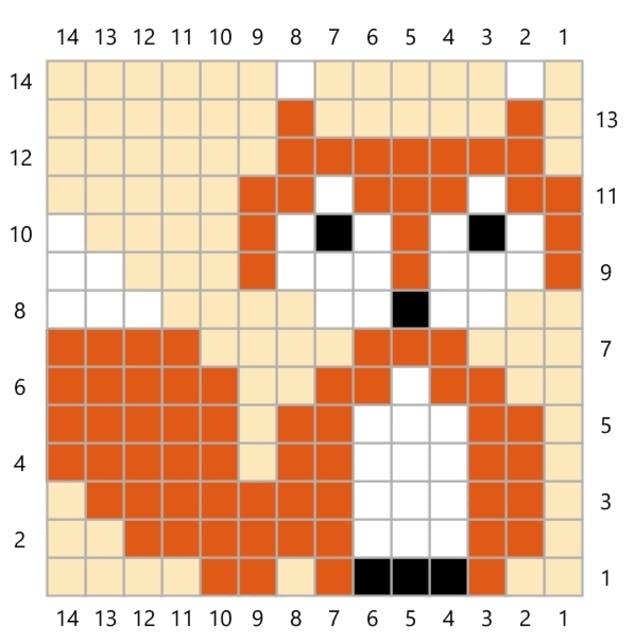
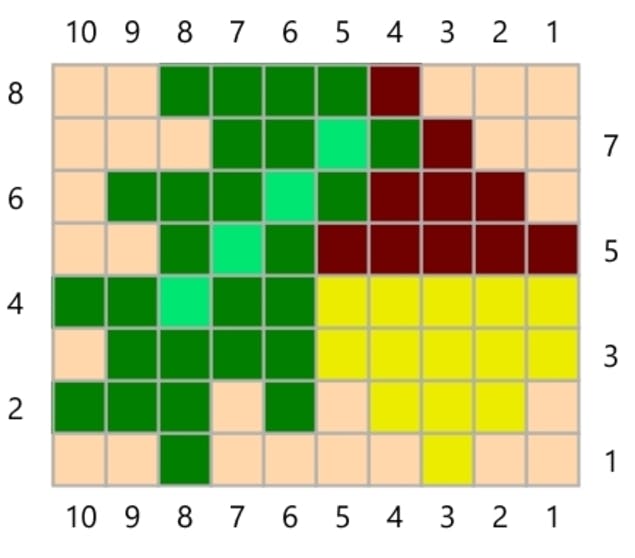
We are going to start with Mr Fox. Each square on the chart represents one double crochet. Mr. Fox is made up of three colors: orange, black and white, the beige color is the color of our background, so we don’t have to worry about it at all.
You can place the chart anywhere you like on your case, I have placed it in the bottom right corner so it’s just at the front of the folded case.
Always place your chart 1 stitch away from the edge
We are going to start with black color, beginning at the 6th stitch of row 1.
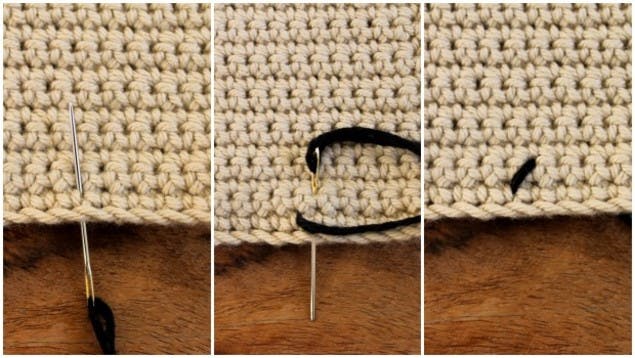
Cut a length of black yarn that’s comfortable to work with. In this case 25cm (10 in) should be more than plenty.
1: Insert the needle from back to front at the bottom-left corner of the designated stitch and draw the needle up.
Leave a 7cm (3 in) length of yarn on the back, which you’ll later weave in.
2: Insert the needle at the top-right corner of the same stitch.
3: Pull the yarn through until it stretches neatly across the stitch.
4: Bring the needle out at the bottom-right corner of the same stitch and draw the yarn through.
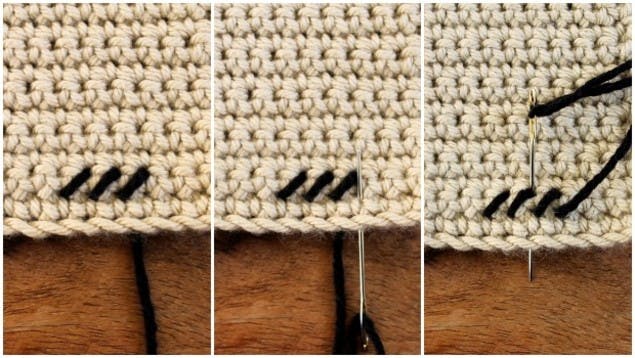
5: Repeat the last 3 steps across the row in the stitches where the chart calls for cross-stitching.
The first half of the row is now complete.
6: Insert your needle at the bottom-right corner of the same stitch you ended the first half with, angled up.
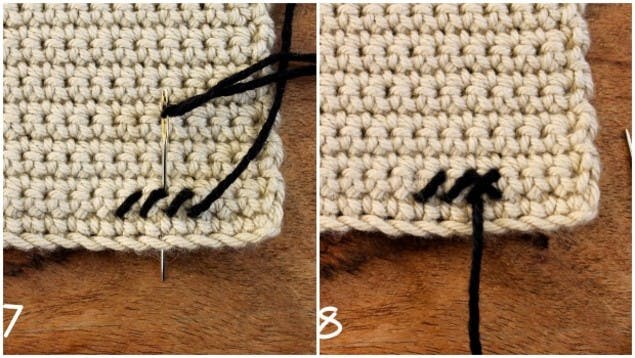
7: Insert your needle into top-left corner of the same stitch. Pull the yarn through until it stretches neatly across the stitch. The thread should form an X with the already-completed first half of the stitch.
8: Bring the needle out at the bottom-left corner of the same stitch and draw the yarn through.
Repeat the last 2 steps across the row, completing each cross-stitch.
When you finish working cross-stitches with a particular color, weave in the ends through background stitches (at the back of work) for several centimeters to hide the strands, and then cut off the excess yarn.
Repeat the same steps when cross stitching the acorn chart, which I placed in the top left corner of the case. The acorn is worked using 4 colors: mustard, brown, dark green and light green, as before beige is our background color.
Joining the case
1
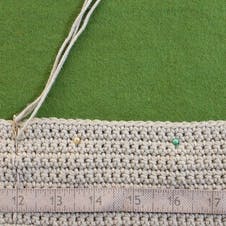
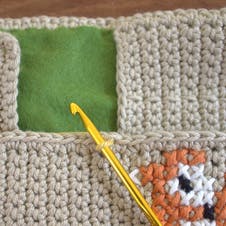
Place the pocket part over felt and using tapestry needle and your main color yarn, sew together width wise (from first row to last), leaving gaps of around 3 cm, those gaps will form little pockets to house your hooks.
2
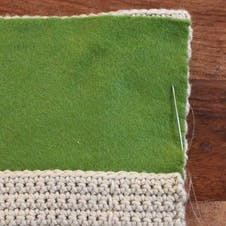
Place felt with attached pocket over the wrong side of main part and using invisible thread (or matching thread) and needle saw the felt to main part of case only along the 3 edges to secure.
3

Pin the flap part to the top edge on the inside of case.
4
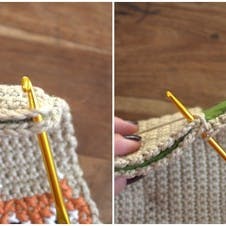
With right side facing, use your main color and starting in the top right corner, work a row of double crochet all along the case, making sure that by doing so you also join the top edge of flap, the sides and bottom edge of pocket to the main part of case.
5
Making the ties: Re-join a contrast colored yarn to the double crochet border at the middle point on the side of case.
Chain 70 (tie should measure approximately 47 cm/18.5 in).
Fasten off and weave in the ends, repeat on the other side.
Your lovely crochet case is now complete!
Perfect for storing all your hooks, the case will also make a fantastic present for an avid crocheter!