Crochet Club: The out & about backpack
Published on January 28, 2019 By Kate Eastwood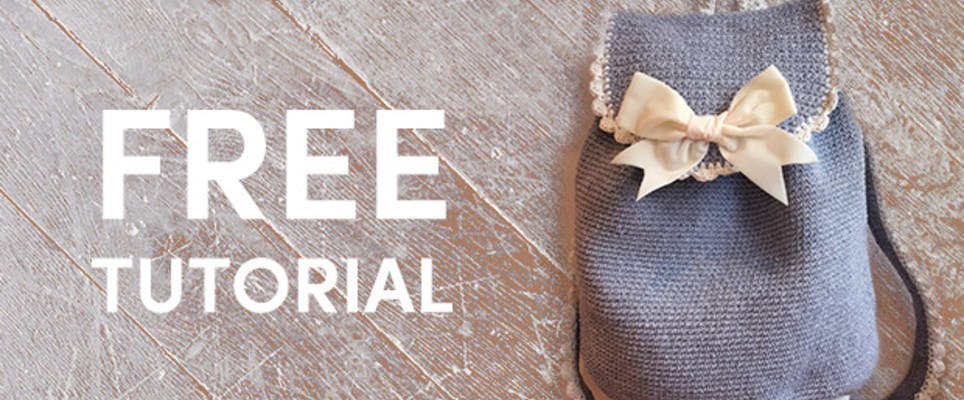
Looking for beautiful DIY crochet projects you can take with you wherever you go? Learn to crochet this gorgeous 'Out & About' Backpack by Kate Eastwood for a fun practical make, and a perfect crochet gift. Customise your finished bag with a bow, crochet flowers or pompoms for that extra-special personal touch!
On those ‘out and about’ sort of days, what could be more perfect to put all your bits and bobs in than this pretty backpack!
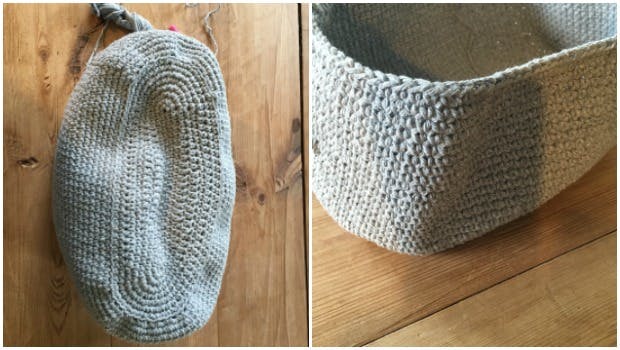
The measurements of the finished backpack are approx. H 42cm x W 37cm x D 12cm, and it is modelled here by my daughter who is 5’4” tall.
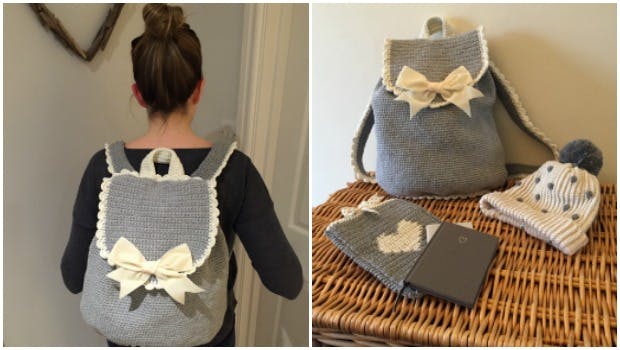
The backpack is designed to have a flap over top, under which is a drawstring tie and there is a small carry handle on the top, as well as two shoulder straps.
The pattern is written in UK crochet terms, but you can translate into US terms using our handy conversion tables.
The backpack is made with an oval base and then the main body of the bag is added on to this and worked in the round. The flap top and straps are added on separately afterwards.
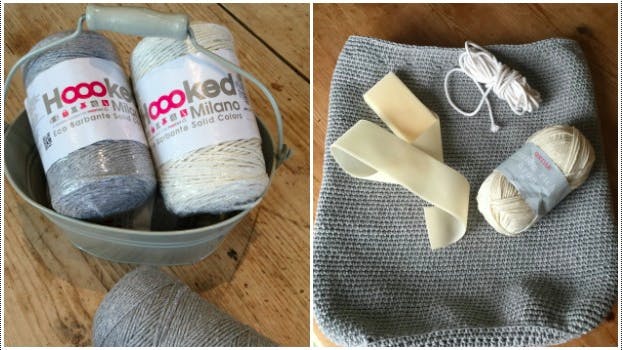
Materials
- 4 x Hoooked Eco Barbante Milano - Gris
- 4 balls in Gris
- 3 x Paintbox Yarns Cotton Aran - Vanilla Cream
- 3 balls in Vanilla Cream
- Approx. 75cm of cord
- KnitPro Waves Crochet Hook - 3.5mm
- Size 3.5mm
- Popper fastener
- Ribbon
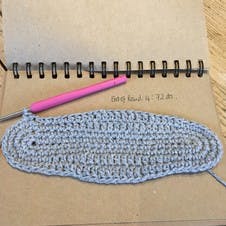
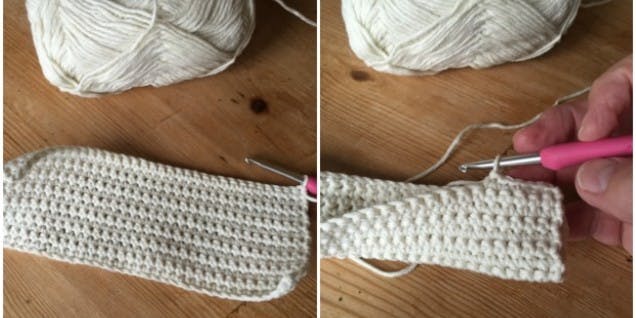
The bag's base
Round 1

To begin make a chain of 26.
Starting in the second chain from the hook work 1 DC. Work a DC in to each of the next 23 stitches and then work 3 DC in to the last stitch.
You are now going to continue on round by working down the other side of the chain. So, continuing on round, work a further 23 DC, 2 DC in first stitch, then join with a SL ST in to the first stitch. 52 sts
Round 2
Chain 1, work 2 DC into the first DC, DC 23. Work 2DC into each of the next 3 stitches, DC 23, 2 DC in each of the next 2 sts and then SL ST to join. 58 sts
Round 3
Chain 1 and work 2 DC in to the next stitch, work 4 DC, 4 HTR, 9 TR, 4 HTR, 4 DC. Work 2 DC in to each of the next 4 sts, 4 DC, 4 HTR, 9 TR, 4 HTR, 4 DC, 2 DC in each of the next 3 sts, SL ST to join. 66 sts
Round 4
Chain 1, 6 DC, 4 HTR, 9 TR, 4 HTR, 6 DC. Work 2 DC in to each of the next 4 sts, 6 DC , 4 HTR, 9 TR, 4 HTR, 6 DC, 2 DC in each of the next 4 sts, SL ST to join. 74 sts
Round 5
Chain 1, work a DC in to the same st and work DC all the way around. SL ST to join. 74 sts
Round 6

Chain 1 , 2 DC, 25 HTR , 2 DC. * 2 DC in next stitch, 1 DC, 2 DC in next stitch , 2 DC*, Repeat from * to * once. 25 HTR, 2 DC, 2 DC in next stitch, 1 DC, 2 DC in next st, 2 DC, 2 DC in next st, 1 DC, 2 DC in next stitch, Sl ST to join. 82 sts
Round 7
Chain 1 and work a DC in to the same stitch. DC all the way around. SL ST and join. 82 sts
Round 8
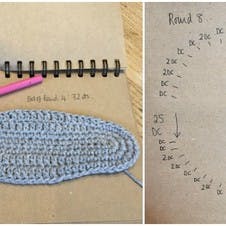
Chain 1 ,1 DC, 2 DC in next stitch, 25 DC , (2 DC in next stitch followed by 1 DC ) twice, (2 DC in next st, followed by 2 DC) three times, 2 DC in next stitch, 1 DC, 2 DC in next stitch, 25 DC, ( 2 DC in next stitch, 1 DC) twice, ( 2DC in next stitch, 2 DC ) twice, 2 DC in next stitch , 1 DC, 2 DC in next stitch, Sl St to join. 96 sts
Round 9
Work a round of HTR. 96 sts
At the end of Round 9, SL ST to join and finish off, sew in your ends.
The main body
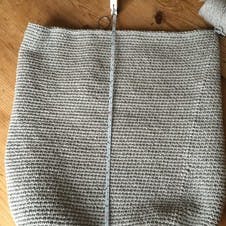
You are now going to start working on the main body of the bag, but first you need to lay your base piece wrong side down and mark 34 stitches along one edge, using stitch markers. This will be the back edge of the base, the rest of the stitches (60 sts) will be the front part of the backpack and we will be increasing in to these stitches to give the bag its shape.
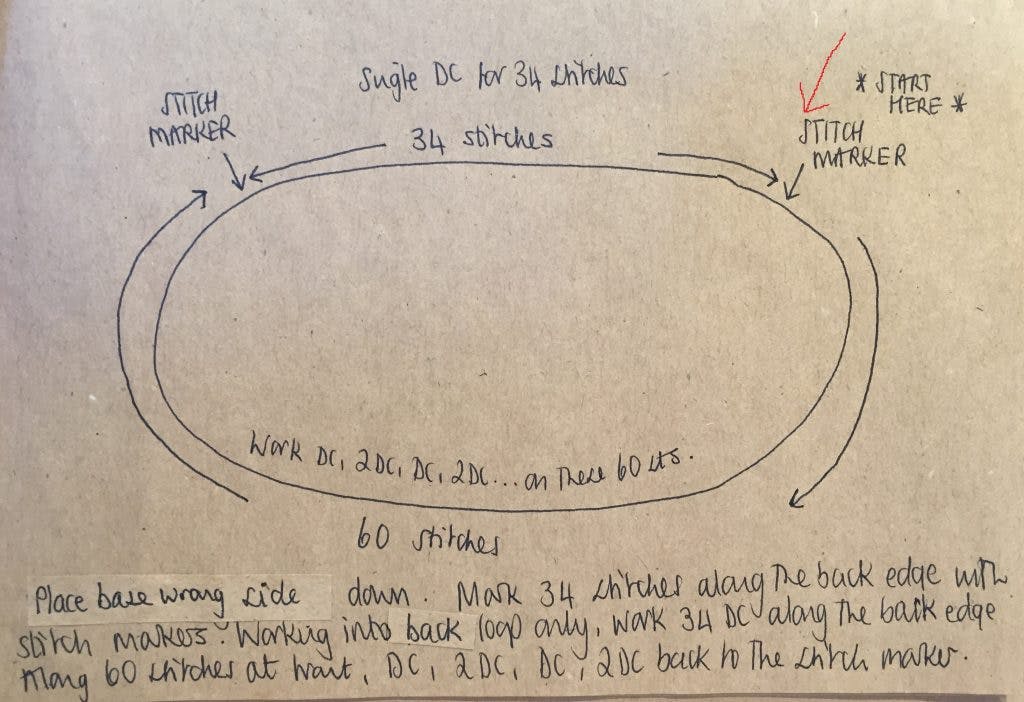
Once your two stitch markers are in place, and following the diagram above, working with the right side facing you and working in to the back loops only, work 34 DC from the starting stitch marker to the finishing stitch marker. (By working in to the back loops only you will see that you are able to create a ‘fold point’, so that the wall of the bag can be worked upwards from the base.)
When you reach the second stitch marker you are now going to start your increasing, so into the next stitch work 2DC, Your next stitch will be a regular DC and the following stitch 2 DC in to one. Continue this pattern all the way around and back to the first stitch marker. SL ST to join.
You should now be able to see that you have a straight back edge to the base and then a curved shape to the front edge of the base. You should now have 124sts.
You are now going to continue working in rounds.
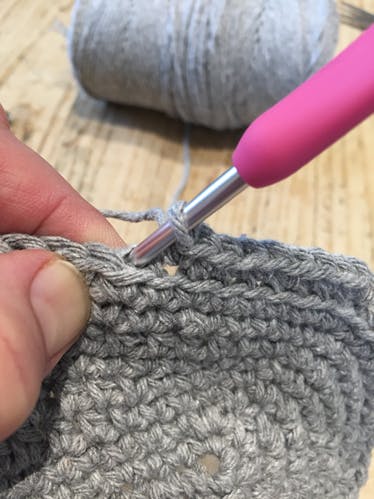
To keep your joining seam nice and neat I join my rounds as follows:
1
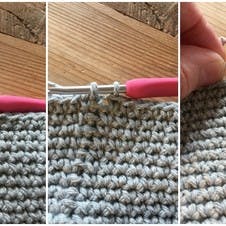
At the end of each round, SL ST to join. Pull your yarn nice and tight, yarn over and pull through. Pull the yarn tight.
2
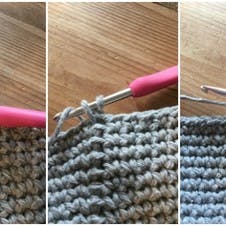
Now, keeping your tension tight, chain 1 and then work a DC all in to the same stitch. You are now ready to continue working your next round of DC.
3
Continue working in rounds (124 sts) until your work measures approx. 36cm from the straight edge of the base to the top. Finish off and sew in ends.
In the next 2 rounds you will be making the holes for the drawstring tie, so start by placing your two stitch markers on the back of the bag, to mark the beginning and end of the flat edge. 32 sts
With the back of the bag facing you, join in your yarn at the left hand stitch marker and work as follows:
DC 2, *CH 2 and skip 2 stitches, DC 5,* repeat from* four more times , CH 2 and skip 2 stitches, DC 3, CH2 and skip 2 stitches, DC 1. This will have taken you to the centre of the front. Continue working the round, working the buttonhole pattern as follows: DC1, CH 2 and skip 2 sts, DC 3, CH 2 and skip 2 stitches.
* DC 5, CH 2 and skip 2 stitches * five times, DC 2. Work 34 DC, which will bring you back to the first stitch marker.
Do not SL ST and join as in previous rounds, as we are just going to work in a continuous round from now.
So, continuing on round, work a round of DC, working 1 DC in to each of the two chain stitches from the previous round.
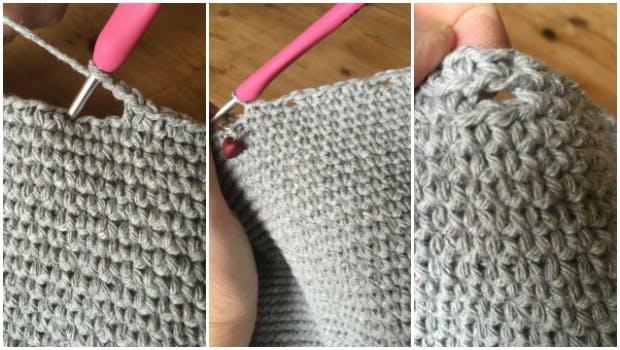
At the end of this round work a further two rounds, finish off and sew in ends, leaving the stitch markers in place.
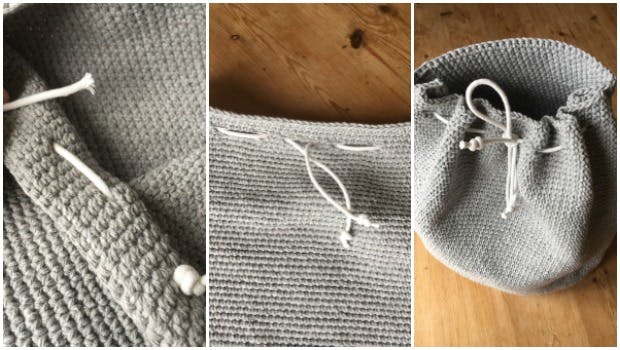
To thread your drawstring, take your piece of cord and cut it in half. Tie a large knot at one end of each piece and thread the cord in and out of the buttonholes, beginning with the knot on the inside at the back edge. (Note: the cord runs across the front of the back pack only, so there will be no cord along the straight back edge.) The two buttonholes at the centre front are where you will be pulling the cord through to the front. Adjust the length of the cords and tie knots in the ends.
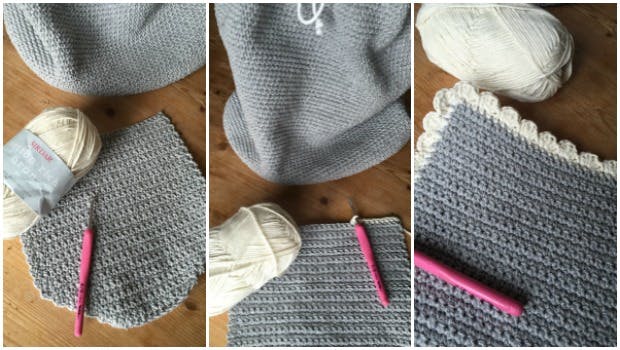
The front flap piece
Row 1
Chain 11.
Starting in the 2nd chain from the hook work 2 DC in to the first st, DC, then work 2DC in to the last stitch. 12 sts. Ch 1 and turn.
Row 2
DC 2 in to the first stitch, DC 12 , DC2 in the last stitch. 14 sts. Chain 1 and turn.
Row 3
DC 2 in to the first stitch, DC 14 , DC 2 in the last stitch. 16 sts. Chain 1 and turn.
Continue working this pattern until you have 32 stitches.
Work 27 rows of DC, remembering to ch 1 and turn at the end of every row. Finish off and sew in ends.
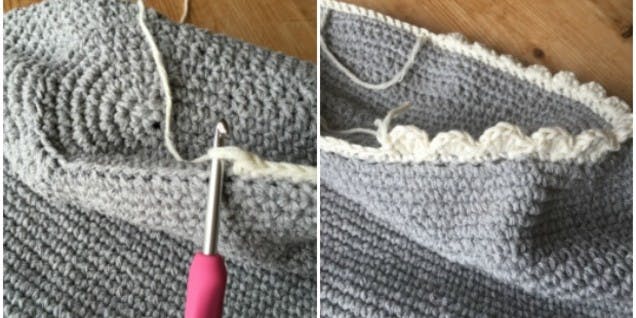
Using the cream yarn and a 4 mm hook work a round of DC all the way around the edge of the flap, working 3 DC in to the corner stitches.
For the second border row work as follows: SL ST, * skip a stitch, HTR, 3 TR, HTR all in the same stitch, SL ST in to the next st *. Repeat from * to * all the way around the edge. Finish off and sew in ends.
To make the central hand strap
Using the cream yarn and a 4mm hook Chain 35. Beginning in the second chain from the hook work 14 rows of DC, remembering to ch 1 and turn at the end of each row.
Fold the strap in half lengthways, wrong sides together and join together with a row of DC. Finish off and sew in ends.
To make the shoulder straps
Make 2
Chain 101, and starting in the second chain from the hook work 11 rows of DC, remembering to chain 1 and turn at the end of each row. Finish off and sew in ends.
Fold the straps in half lengthways and using the cream yarn and a 4 mm hook, join together with a row of DC. Finish off at the end of the row.
Rejoin your yarn back at the beginning of the first row of cream and work the same scallop edging as for the flap: *SL ST, miss a stitch, HTR, 3 TR, HTR all in the same stitch. Repeat from *

To finish off the bottom of the bag
Using the cream yarn and a 4 mm hook work a round of DC around the edge of the base of the bag. As this is the round where you were working in to the back loop only you will only be working in to one loop.
For your second round work the same scallop edging as before.
To finish your bag, pin your hand strap and shoulder straps on to the front flap. I found it quite helpful to mark the central point of the flap so that you can get the straps evenly placed. Using a needle and some strong thread sew the straps in to place.
Use your stitch markers to position the flap on to the bag, pin and stitch in place.
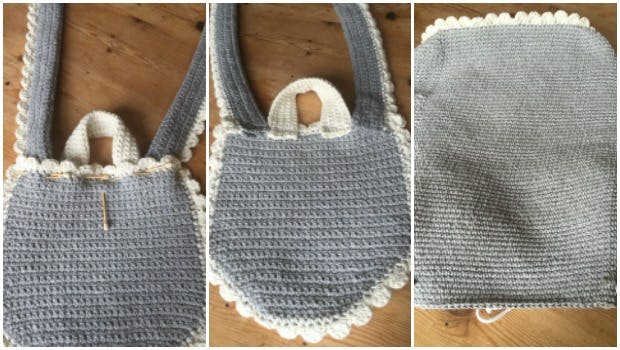
The final step to complete your backpack is to add either a bow or perhaps some crochet flowers to decorate the front flap. Sew a popper on the underneath of the flap and onto the front of the bag to secure the flap in place